


 Tweet
Tweet
Salve Subbi,
stavo cercando testimonianze di qualcuno che abbia montato da se lenti ottiche graduate sulla propria maschera, l'ideale sarebbe se lo avete fatto sulla Focus della Cressi. Ve lo chiedo perché insieme alle lenti non viene fornita alcuna istruzione e non vorrei romperla.
Qualsiasi consiglio č utile quindi se avete info dateci dentro. Giusto per farvi un idea, un amico mi ha suggerito di scaldarla un pň con l'asciugacapelli per avere il silicone un po' piů morbido cosě da non spaccarlo...
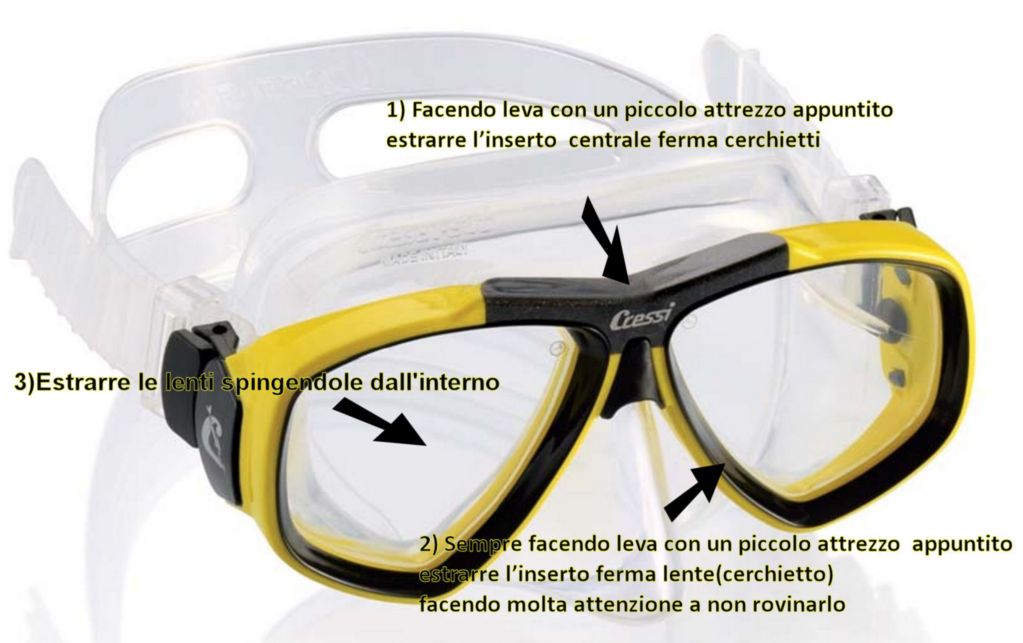
In rete ho cercato un pň ovunque e le uniche info sulla mia maschera sono le seguenti: questo link 3d inseriscono questa interessante foto
stavo cercando testimonianze di qualcuno che abbia montato da se lenti ottiche graduate sulla propria maschera, l'ideale sarebbe se lo avete fatto sulla Focus della Cressi. Ve lo chiedo perché insieme alle lenti non viene fornita alcuna istruzione e non vorrei romperla.
Qualsiasi consiglio č utile quindi se avete info dateci dentro. Giusto per farvi un idea, un amico mi ha suggerito di scaldarla un pň con l'asciugacapelli per avere il silicone un po' piů morbido cosě da non spaccarlo...
In rete ho cercato un pň ovunque e le uniche info sulla mia maschera sono le seguenti: questo link 3d inseriscono questa interessante foto
Questa guida in Inglese postata nelle review di amazon da un utente frustrato quanto me...
These lenses fit the Cressi Focus mask just fine, and it's a good mask.
These lenses fit the Cressi Focus mask just fine, and it's a good mask.
I'm deducting TWO stars because of the incredible frustration trying to figure out how to install the lenses in the mask. A single sheet of paper with a couple of illustrations would be so easy to include, but there is nothing!
Once you understand HOW to remove and replace the lenses, it's pretty easy. But it is NOT intuitive, and I couldn't find anything online that explained it clearly.
FYI, here are the basic steps:
1. There is a small triangular piece of plastic at the top of the nose. This must be pulled straight out, as you look at the mask. You can see behind it that there is a little tab. If you push the tab towards yourself with a small screwdriver, that will push this piece out.
2. There is a bridge (where a "uinibrow" would be) with the Cressi logo on it just above the piece that you just removed. That piece needs to be pushed straight up, towards the ceiling as you face the mask. It's just a friction fit.
3. Here is the hardest part to figure out: the two plastic rings that hold the lenses in place. You can't just force them out. If you look carefully at the front of the mask around the outside of the two retaining rings, you'll see three areas about 1/2" long each, which is where there are little plastic tabs that stick out from the retaining ring and hold it in place. The ring is somewhat flexible, so all you need to do is get a fingernail (or something) on the outside of the ring near one of the tabs, and push inwards towards the center of that lens. This will get the tab out of its slot and allow you to pull it forwards slightly away from the lens. Do this for all three tabs.
4. The old lens pops out at this point and you simply set the new lens in its place.
5. The only tricky part about putting it all back together, is that you really need to exert some force when pressing the retaining rings back into position against the face of the lenses. The tabs need to snab back into their retaining indentations. If you put the mask face-down on a table, you can press down on the inside of the mask and that will help force the retaining rings all the way back into position.
6. Now it's easy: simply replace the "unibrow" piece by pressing it straight down from above - you can see the plastic part of the mask that it slides down onto.
7. Finally snap the little triangular piece back into position by pressing it straight in. Again, after it's out, it's easy to see how it goes back in.
Sheesh, why couldn't Cressi have included this little explanation along with a few line drawings with their mask and/or lenses?


Commenta